This article shows you how to use the merge function in our text messaging application. This is useful when you want to send personalised marketing text messages by merging data fields into your message.
This is a relatively advanced feature of the system and the process outlined below should be followed precisely to ensure a successful campaign.
Overview: The step by step process
1. What is a CSV file and how the data should be formatted – Update: a new data helper added
2. Creating a “merge group” in the system
3. Uploading your CSV file to the “merge group”
4. Creating the campaign and inserting “merge” fields into the message
5. Previewing the campaign, editing & submitting the campaign
Step 1: Understanding & creating your CSV File
A CSV file is a Comma Separated Values file. They are easily exported from Excel or almost any other software. If you are not familiar with CSV files, you should seek technical help within your company.
UPDATE: There is a new Merge Data Helper Excel file you can download, add your data and then copy & paste the merge CSV format data into your Text Marketer system.
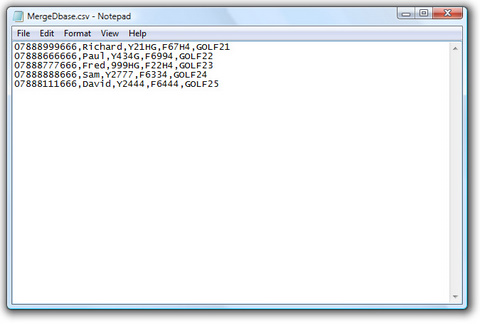
Above you’ll see an example CSV file, ready for merge upload. Each line is a “record” or “row” and each bit of data between each comma is a “field”. So in each line of the example above, we have the following data:
“mobile_number,name,username,password,code”
There are 5 records in our example CSV database.
Create or export your CSV file, following the rules shown below and save it on your computer ready to upload to your account. (Step 3.)
VERY IMPORTANT – Rules for CSV files for Text Marketer:
1. The mobile number MUST be saved as the first field in each row
2. You can have up to a maximum of 4 additional custom fields in addition to the mobile number
3. There is a maximum of 60 characters for each custom field
4. Commas are used to separate the fields, do not use them in your data
5. The maximum number of rows you can upload at one time is 50,000
Step 2: Creating a “merge group” in the system
Now we have the CSV file prepared, the next step is to create a special “merge group” in your system.
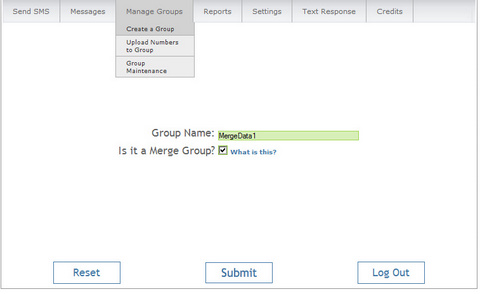
Log in and go to Groups -Create a Group. Give the group a name and tick the box “Is it a Merge Group?”. This tells the system to expect a merge group CSV file instead of the normal single column of numbers used in non-merge campaigns.
Then press Submit.
Step 3: Uploading your CSV file to the “merge group”
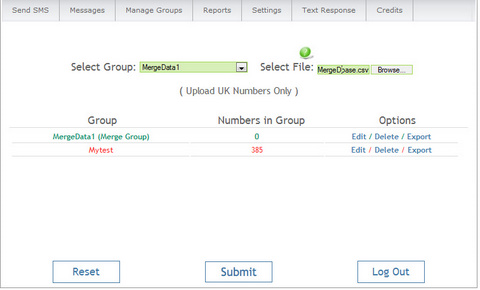
After creating the “merge group” you will be returned to the screen above with the group you have created already selected.
Next to Select File, click the grey Browse button (or you can copy and paste in the data in the relevant field).
Navigate your way to the CSV file you created and saved in Step 1.
When you have found the CSV file, double click the file or highlight it and select open.
(You will see the path to the file now appears in the window next to Select File.)
Then click Submit.
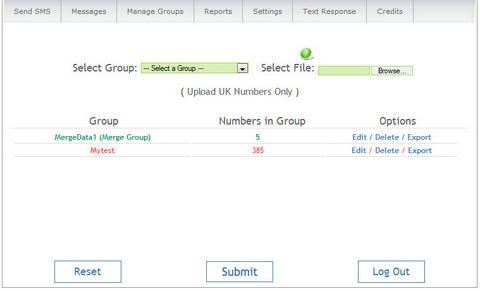
If any errors are found in your file these will be reported. If this is the case, please go back to Step 1 and see the “Rules for CSV files”. If your file uploads successfully, you will see the “Numbers in Group” for your “merge group” change from zero to the numbers of records in your CSV file.
In our example CSV file we had 5 records which we uploaded to the group “MergeData1” so it is now displaying 5 records in that group as per below.
Step 4: Creating the campaign and using “merge” fields in the message
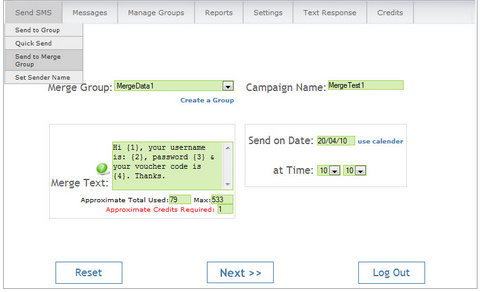
To create a merge SMS campaign go to Send SMS – Send to Merge Group
Then select the merge group you are sending to (MergeData1 in our example).
Give the campaign a name for your records (this can be anything useful to you but is not set as the sender name for your campaign).
Select the date and time to send your campaign and then we’ll create the message.
How To Create A Merge Message
The code you need to insert into a message to pull through a custom field is {1}, {2}, {3} or {4} where the number corresponds to the position of the custom data field in each record in your CSV file. The custom fields exclude the number column so {1} is the first data field.
If you only have one custom field then you will only ever need {1}. If you remember, in our example CSV file (from Step 1) the order of each record was “mobile_number (which is ignored for data merging),name,username,password,code” so in the message above we have created:
“Hi {1}, your username is: {2}, password {3} & your voucher code is {4}. Thanks.”
You can now create your message following this example and insert the {1}, {2}, {3} or {4} (if you are using all 4 custom fields) in your message as appropriate.
Then click Next >> Don’t worry, there is a preview screen next to check your message before it is submitted!
Step 5: Previewing the campaign, editing & submitting the campaign
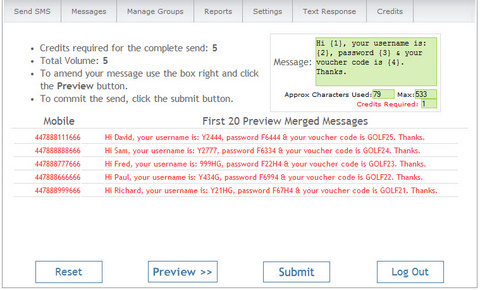
Once you have clicked Next >> you will be given a preview of up to the first 20 merged messages.
This allows you to check the messages look OK.
The message box also re-appears so you can make amendments to your message if it doesn’t look right. If you do make amendments in the message box, click Preview >> afterwards to preview the first 20 messages again with the amended message text.
IMPORTANT – Information on credits usage with merged campaigns
Merging data can and will produce different message lengths depending on your data (if someone has a long name for example).
This can have the effect of using more credits for a particular message. Therefore this screen also shows you the total credits required for the campaign and the total volume (or, number of mobile numbers you are sending to).
Should these numbers differ it means that some of your data fields are pushing the total character count in those messages over the limit.
You can either choose to accept this and submit the campaign or you may wish to trim the message (remember to hit Preview >> to reload the new message) until you are happy with the credits required number.
In our example everything looks fine with 5 credits needed to send our 5 text messages so we can now Submit the campaign.
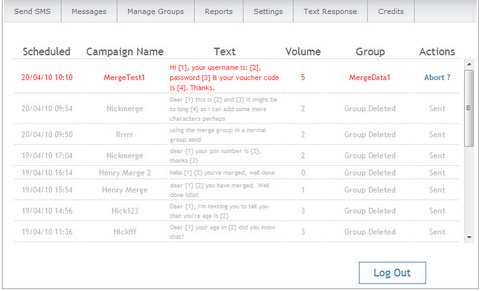
You will then see your normal campaign log screen with the campaign details. If you are happy with this then simply leave the campaign to process. If you are not happy, hit the Abort? link next to the campaign to abort.

