An easy to follow guide on how to upload files into Message Box from Excel.
1. Create an excel spreadsheet
Firstly, open a new excel spreadsheet and save it as a .csv file to your documents with an appropriate name.
To do this click ‘File’ > ‘Save as’ > ‘Browse’ > then where it says ‘Save as type’ select ‘CSV (Comma delimited) and click ‘Save’
*If a pop-up box appears that says “Some features in your workbook might be lost if you save it as a CSV (Comma delimited).” Click ‘Yes’
*Please note if you have email addresses in any column you will have to save this as an Excel file
2. Add numbers into excel spreadsheet
Copy and paste all your numbers into column A, and if you have any names, add the first name into column B and the surname into column C.
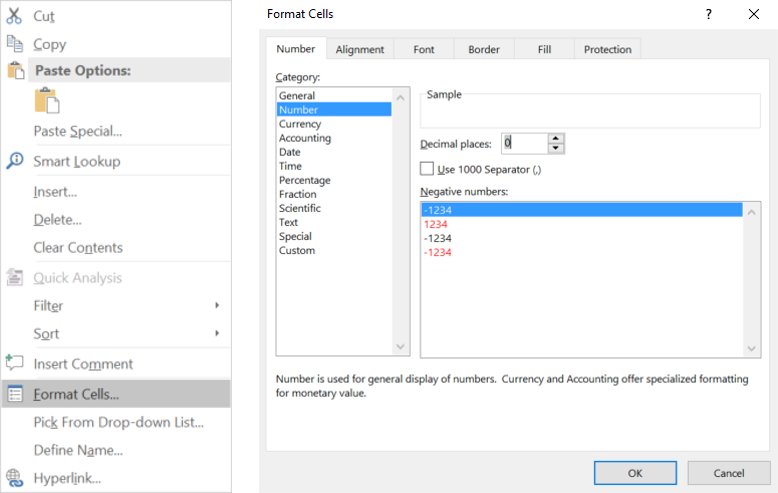
To ensure your numbers are in the correct format highlight column A, then right click on the column and select the ‘Format Cells’.
This will bring a pop-up box, from here select the ‘Number’ tab on the left and where it says ‘Decimal places’ make sure that is ‘0’. Then click ‘OK’
Your numbers should now be in the correct format. When manipulating mobile numbers in Excel, the leading zero from your list of numbers is often deleted. If this happens, don’t worry, Message Box will automatically recognise that the zero is missing and replace it.
If there are any characters that are not numerical within the mobile numbers, then the system will not import these numbers and recognise it as a ‘bad’ number. You will need to go through your numbers and see which ones have extra digits, letters, characters, spaces, or do not contain 11 digits.
If you have any other sheets on the spreadsheet we advice that you remove these, Message Box will only upload the first sheet anyway.
Once you have checked all the numbers and any other extra columns you require save the excel spreadsheet.
3. Upload contacts into Message Box
Log into your account and click the ‘Manage Contacts’ button. Click the group you want to add your new contacts into or create a new group by clicking the ‘New’ button under the ‘Group’ tab.
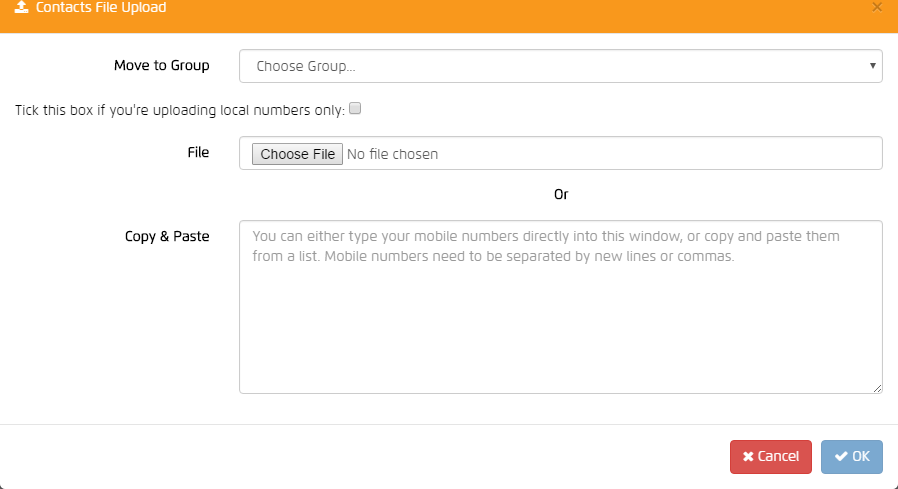
Once the group has been selected, click the ‘Import’ button and the box below will appear.
Select the group you want to add the contacts into using the ‘Choose Group’ drop-down box. Then click the ‘Choose File’ button and find your file that you have made with all the contacts in. Then click the ‘OK’ button.
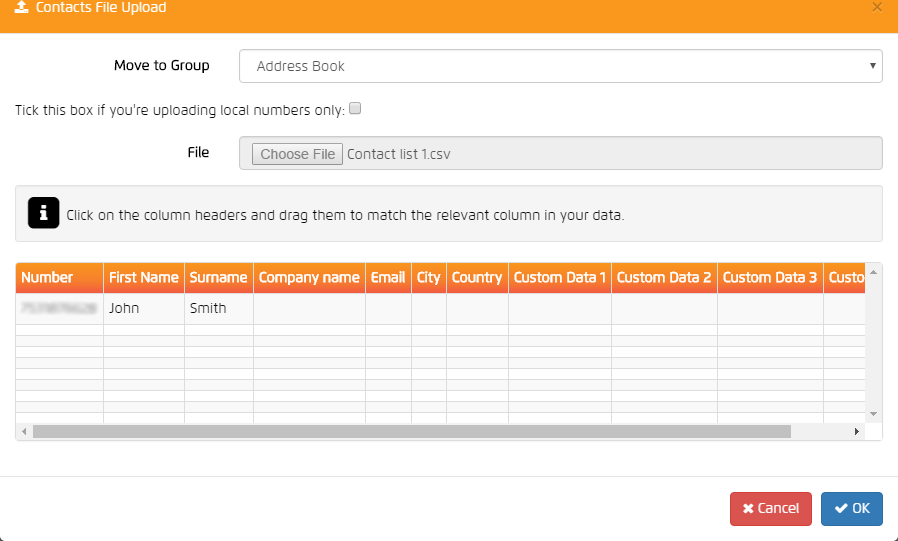
This will bring up a progress bar and once the file has been uploaded a new box should appear like the one below
All your numbers should be in the ‘Number’ column, first names in the ‘First Name’ column and last names in the ‘Surname’ column. If for some reason they are not, you can drag and drop the boxes so they match.
Once everything looks good, click the ‘OK’ button.
A new box should appear that shows how many of your contacts were imported, how many are duplicates (if duplicates they will not be uploaded) and how many are bad numbers (bad numbers will not be uploaded).
4. Ready to send
All your contacts are now upload and you are ready to send a text message to them. So, what are you waiting for, go go go, send them a text message and enjoy the great response.
We hope this guide has helped but if you do need any help, please don’t hesitate in giving us a call on 0117 205 0202 and we will help you with any queries you may have.
For more helpful guides on how to use Message Box, have a read of all our guides here.


